
.jpg)
 2 months ago
57
2 months ago
57
PROTECT YOUR DNA WITH QUANTUM TECHNOLOGY
Orgo-Life the new way to the future Advertising by AdpathwayThese adorable cardboard tube chicks are an easy kid’s craft tutorial for spring or Easter. All you need is a cardboard tube, paint, and pipe cleaners.

Cardboard Tube Chick Tutorial
This is a fun craft for Easter and for spring as well. It’s also part of my cardboard tube farm series! Make these cute toilet paper roll chicks with your kids today!

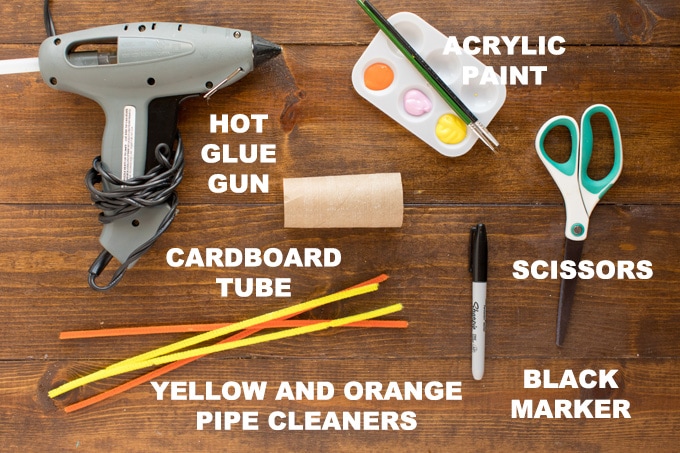
Supplies you will need
- Cardboard tube
- Acrylic paint: yellow, pink, orange
- Yellow and orange pipe cleaners
Helpful crafting tools
Crafting Tips
- To simplify this project for younger kids, use wiggle eyes instead of a marker, or simply draw the eyes on for your children.
- You can also substitute felt or construction paper for the wings, beak, and tufts of hair. This would work for the feet as well.
- I do use a hot glue gun for this project. You can use Beacon’s 123 instant grab glue or other fast dry glue if you prefer. You can also use white craft glue but will need to hold the wings, tufts of hair, and feet in place as the glue sets.
How to make Cardboard Tube Chicks
- Cut cardboard tube to desired size, mine are 1 1/4″ high.
- Paint inside and outside of cardboard tube with yellow paint and let dry.
- Cut 3 small pieces of yellow pipe cleaners, about 3/4″ long each. These are the tufts of hair. Glue them together at the ends so that the ends meet and the tops fan out.
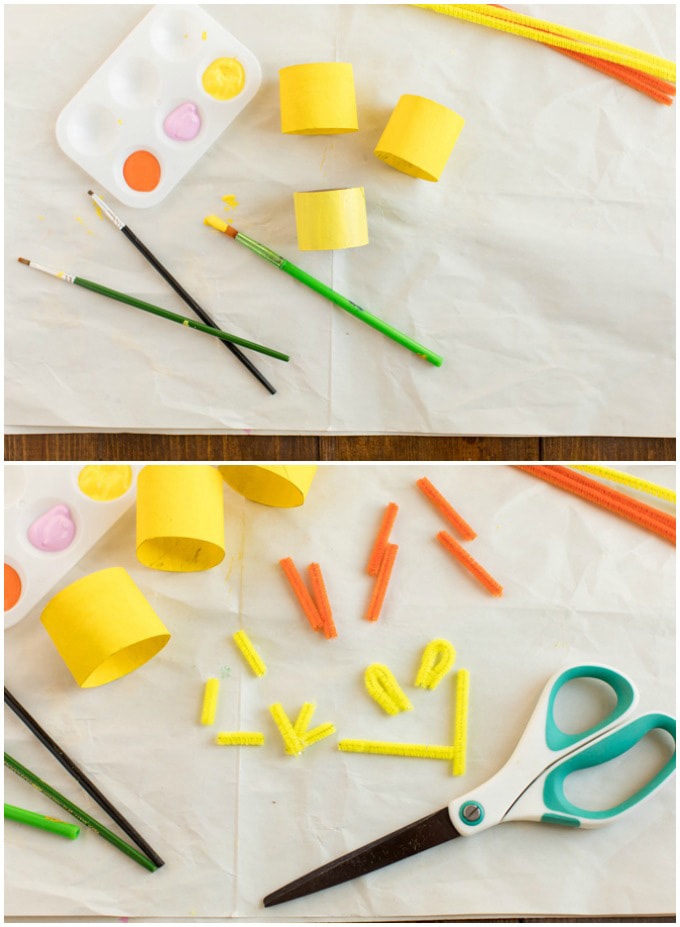
- Cut 2 pieces of orange pipe cleaners, about 1 1/2″ long. These are the feet.
- Cut 2 pieces of yellow pipe cleaners, about 2″ long each. Bend each one in half, these are the wings.
- Glue the tufts of hair inside the top of the cardboard tube. Glue the wings to the side of the tube and the feet stems go inside the bottom. Bend them so they stick out the front. See below.

- Use orange paint to add the beak, and a Sharpie marker to add the eyes and eyebrows.
- Use an old scruffy, small paintbrush dipped in pink paint to add the cheeks. Before adding the cheeks, dab off as much excess paint as you can so that you are applying it almost dry.

We love how cute these little cardboard tube chicks are! Super fun craft project for the kiddos.

More Chick Crafts for Kids
- Washcloth Bunny and Chick
- Foam Cup Chick
- Painted Rock Chicks
- Yarn Pom Pom Chicks
- Plastic Spoon Chicks
Cardboard Tube Chicks
Turn recycled toilet paper tubes into darling little baby chickens – perfect for spring or Easter. These cardboard tube chicks are so sweet!
Prep Time5 minutes
Crafting Time25 minutes
Total Time30 minutes
Age Group: Kids Crafts
Project Type: Easter
Author: Amanda Formaro
Supplies
- 1 Cardboard tube
- Acrylic paint: yellow, pink, orange
- 2 each Yellow and orange pipe cleaners
Craft tools
Hot glue and a glue gun
Black marker
Instructions
Cut cardboard tube to desired size, mine are 1 1/4″ high. Paint inside and outside of cardboard tube with yellow paint and let dry.
Cut 3 small pieces of yellow pipe cleaners, about 3/4″ long each. These are the tufts of hair. Glue them together at the ends so that the ends meet and the tops fan out.
Cut 2 pieces of orange pipe cleaners, about 1 1/2″ long. These are the feet.
Cut 2 pieces of yellow pipe cleaners, about 2″ long each. Bend each one in half, these are the wings.
Glue the tufts of hair inside the top of the cardboard tube. Glue the wings to the side of the tube and the feet stems go inside the bottom. Bend them so they stick out the front.
Use orange paint to add beak, and a Sharpie marker to add the eyes and eyebrows. Use an old scruffy, small paintbrush dipped in pink paint to add the cheeks. Before adding the cheeks, dab off as much excess paint as you can so that you are applying it almost dry.
Expert Tips & FAQs
- To simplify this project for younger kids, use wiggle eyes instead of a marker, or simply draw the eyes on for your children.
- You can also substitute felt or construction paper for the wings, beak, and tufts of hair. This would work for the feet as well.
- I do use a hot glue gun for this project. You can use Beacon’s 123 instant grab glue or other fast dry glue if you prefer. You can also use white craft glue but will need to hold the wings, tufts of hair and feet in place as the glue sets.
This post originally appeared here on Mar 28, 2011.
Amanda Davis is the crafty, entrepreneurial mother of four children. She loves to bake, cook, make kid's crafts and create decorative items for her home. She is a crafting expert and guru in the kitchen and has appeared online and in print publications many times over the years.
Latest posts by Amanda Davis (see all)


 English (US) ·