
.jpg)
 1 year ago
116
1 year ago
116
PROTECT YOUR DNA WITH QUANTUM TECHNOLOGY
Orgo-Life the new way to the future Advertising by AdpathwayAuthor by Ann Kollegger on April 18, 2025 Updated on April 18, 2025
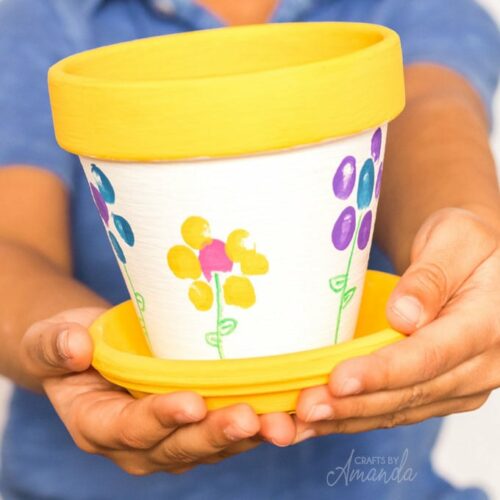
These fingerprint flower pots make the perfect keepsake gift idea for spring! Plant seeds or flowers in them to give for Mother's Day or for a birthday.
This sweet fingerprint flower pot can be made with supplies you probably have on hand. This project will easily engage kids from 3-10 years old with a lot of creative steps and makes a perfect project for Spring!

Fingerprint Flower Pot Tutorial
These flower pots are a great keepsake for Mother’s Day or as a birthday present. It reminds me of this Bouquet of Fingerprint Flowers! In case you don’t have terra cotta pots, I’ve included some alternatives you can use instead.
You can extend this project by planting seeds in the pots and turning it into a science lesson by having kids document the sprout and growth of the seeds. Or, you may love the idea of creating Homemade Plantable Seed Paper that you can include with some soil as part of the gift!
Craft supplies you will need
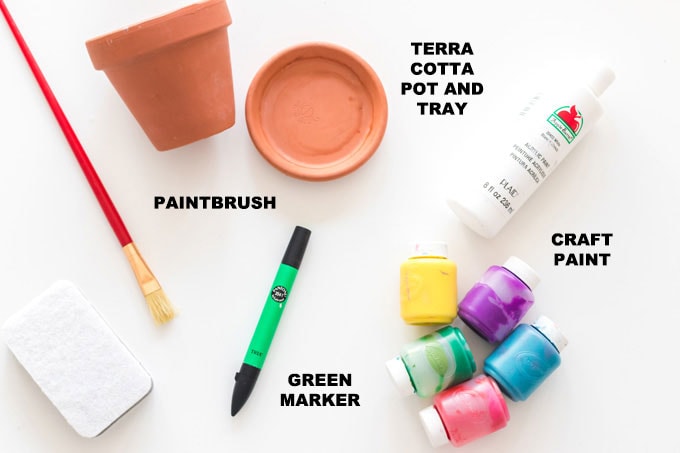
- Assorted color acrylic paints (flowers)
- White and yellow acrylic paint (pot)
- Paintbrushes
- Terra cotta pot with base dish
- Green permanent marker or paint marker
- Fine grit sandpaper (if using plastic flower pot)
- A paint palette
- Newspaper or tablecloth to cover work surface
Alternatives:
- If you have old plastic pots, use fine grit sandpaper and gently scuff up the outside so the paint can stick better. You can see our complete tips for painting on plastic here.
- Paper cups work great too! I would skip steps 1-4 and start on step 5 below.
Optional:
- Soil and seeds
- Plastic wrap
- Rubber bands

Craft information
- Age Level: 3-10 years old. Younger kids (3-5) will need help with some steps.
- Mess Factor: Messy. Both acrylic paint and the marker is permanent so have the kids wear an apron or an old shirt to prevent stains.
- Time to Complete: 45 minutes including drying time.
- Cost estimate: 6” terra cotta pots are about $1.50 each.
Craft Tips
- As an alternative to using newspaper to cover my work surface, I use an old window shade. It is easy to clean and roll back up to use next time!
- Use a hair dryer on the low setting to help dry the paint quickly.
- If the acrylic paint is too thick, mix in a couple of drops of water to thin it out.
- Scoop some paint onto a damp sponge and have your kids dip their fingers in the sponge instead if you are concerned about spillage.

How to Make a Fingerprint Flower Pot
- Make sure the flower pots are clean. Wash and dry as needed.
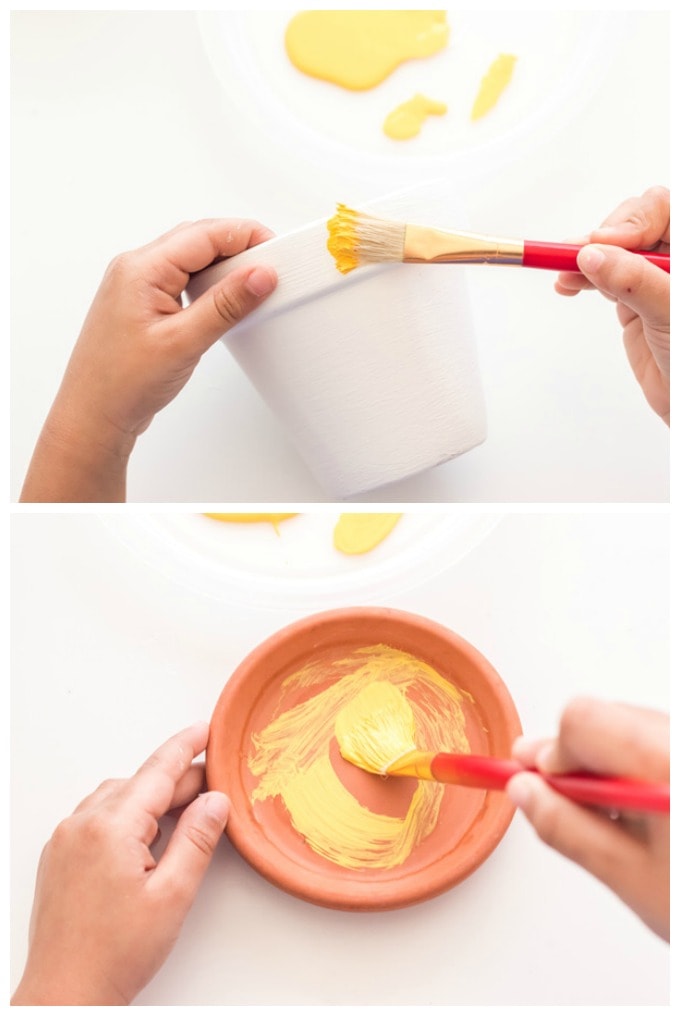
- Use the white acrylic paint to paint the outside of the pot and the dish. Dry with hair dryer on low setting. Repeat those steps until you have an even, dry white surface. It took me 4 coats of paint to get good coverage.
- Mix a light yellow by adding yellow acrylic to the white in small amounts and mix with brush. Paint the rim of the terra cotta pot and the dish, or the bottom part of the plastic pot (or rim). It took 2 coats of yellow for each part that I painted. Dry with hair dryer.

- At this point, kids should stop and wash their hands, paint palettes, and brushes.
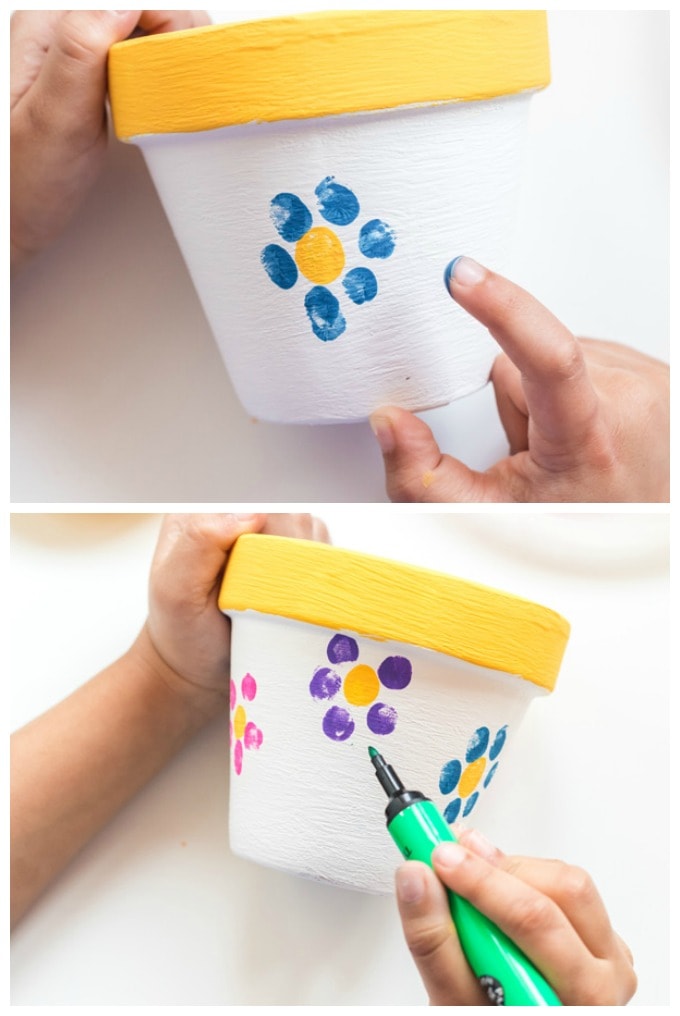
- In the paint palette, mix up the colors you want to use for the fingerprint flowers.
- Using 1 color at a time, lightly press a finger into the paint and then “stamp” a flower design on the pot. Use the damp paper towel to wipe the paint off that finger and choose a different color and “stamp” additional designs on the pot. You can layer multiple colors on top for petals, and use your thumb and a different color for the center of the flower. Dry with hair dryer.
- Again, at this point, kids should stop and wash their hands.
- Finally, using the green marker, add stems and leaves to the flowers.

This fingerprint flower pot is fun for kids to make and a perfect keepsake gift which can be kept for years to come! Plant seeds or flowers in them and enjoy their cheery spot on a windowsill.
You can also attach a Printable Mother’s Day Card for an extra special gift.
More Clay Pot Crafts
- Faux Chalkboard Terra Cotta Pots
- Terra Cotta Pot Windchime
- Sea Glass Planter
- Clay Pot Lighthouse
- Strawberry Terra Cotta Pots
- Seed Packet Decoupage Clay Pots
- Vintage Crackled Flower Pot
Fingerprint Flower Pot
These fingerprint flower pots make the perfect keepsake gift idea for spring! Plant seeds or flowers in them to give for Mother's Day or for a birthday.
Crafting Time40 minutes
5 minutes dry time5 minutes
Total Time45 minutes
Age Group: Kids Crafts
Project Type: Spring
Makes: 1 pot
Supplies
- 1 6-inch Terracotta pot with tray
- Acrylic paint in assorted colors for the flowers
- White and yellow acrylic paint for the pot
- Green permanent marker or paint pen
Craft tools
Paint palette
paintbrushes
Tablecloth or newspaper
Instructions
How to Make a Fingerprint Pot:
Make sure the flower pots are clean. Wash and dry as needed.
Use the white acrylic paint to paint the outside of the pot and the dish. Dry with hair dryer on low setting. Repeat these steps until you have a nice white dry surface. It took me 4 coats of paint to get a good coat.
Mix a light yellow by adding yellow acrylic to the white in small amounts and mix with brush. Paint the rim of the terra cotta pot and the dish, or the bottom part of the plastic pot (or rim). It took 2 coats of yellow for each part that I painted. Dry with hair dryer.
In the palette, mix up the colors you want to use for the finger print flowers.
Choose 1 color and lightly press a finger into the paint and then “stamp” flower designs on the pot. Wash or wipe paint off that finger and choose a different color and “stamp” additional designs on the pot. You can layer multiple colors on top for petals, and use your thumb and a different color for the center of flower. Dry with hair dryer.
Using the green marker, add stems and leaves to the flowers
Expert Tips & FAQs
- As an alternative to using newspaper to cover my work surface, I use an old window shade. It is easy to clean and once dry, I roll it back up to use next time!
- To dry paint quickly, use a hair dryer on low setting.
- If the acrylic paint is too thick, mix in a couple drops of water to thin it out.
- If you have old plastic pots, use a fine grit sandpaper and gently scuff up the outside so the paint sticks to the pot.
This post originally published here on Apr 10, 2020.
Ann Pianta Kollegger has designed craft products, greeting cards and other products which have been sold nationwide. Her most valuable creative moments have been with her own kids and with the patients she worked with at a local children’s hospital.
Latest posts by Ann Kollegger (see all)
About Ann Kollegger
Ann Pianta Kollegger has designed craft products, greeting cards and other products which have been sold nationwide. Her most valuable creative moments have been with her own kids and with the patients she worked with at a local children’s hospital.
Reader Interactions
Free Tutorials+ Free Craft Book!
Get your copy of of "5 Christmas Ornaments to Make" when you subscribe!


 English (US) ·