
.jpg)
 2 months ago
84
2 months ago
84
PROTECT YOUR DNA WITH QUANTUM TECHNOLOGY
Orgo-Life the new way to the future Advertising by AdpathwayLearn how to start a fairy garden of your own! Our fairy garden is made from a simple inexpensive wooden birdhouse and natural materials.

Starting a Fairy Garden
In April of 2015 I moved into a studio space. In May I planted a ton of flowers in the planter boxes under my windows. However, the planter on the left side has an awning above it which keeps it from getting any rain. Sun there’s absolutely no shortage of however, so what do you get with dry and hot? That’s right, basically sand. Starting a fairy garden was the answer.
I tried planting some flowers. They died. I watered them everyday, but it’s as if the water never made it to the roots. So I tried again. They died again. That’s when I decided it would be easier (and kinder) to put in a fairy garden where nothing else would thrive. You can see how this fairy house has held up over the year here!
NOTE: if you prefer to buy a fairy house or fairy garden, be sure to check out all the adorable options on Etsy!

I also wanted to share an amazing story with you. It’s a real life story that took place in Kansas in a little place dubbed Firefly Forest. This is an amazing video and it will melt your heart and remind you that there’s a little magic in all of us. In memory of little three year old Allie. Please watch:
Now on with the fairy garden tutorial…
Supplies you will need
- Wooden birdhouse
- Dried pods
- Twigs
- Colorful silk flowers
- Moss
- Small artificial birds
- Small terra cotta tray
- Tiny terracotta pot
- Hot glue gun
- Wire snips
If you’ve never made a fairy house, they are very easy. Start with a wooden birdhouse and use whatever elements make you happy. Fairies want you to be happy.

I’ll admit, I spent about $35.00 at Hobby Lobby shopping for this garden. I bought two bags of moss, a couple sprigs of colorful small flowers, some sort of dried pods, some twigs and of course the birdhouse.
You don’t have to spend that much, or you can spend more if that makes you smile! I didn’t use all the flowers, pods, and twigs, so I’ll be able to save them for another project. You can use things you already have on hand as well.

Fairies love flowers, birds, and all things from nature. Some houses, like this one, have a mossy roof while others may use flower petals or tree leaves. I’ve seen pinecone shingles as well as sticks and twigs atop their little homes. You can use what you like, just have fun and dust off your imagination.

This is what I started with. Dead flowers and some that are doing fine. So I kept the flowers that are growing and removed the dead plants.
How to Make a Fairy Garden

I started by hot gluing the pods to the birdhouse. I chose the back of the birdhouse as the front of my fairy house. This way I didn’t have to try and hide the little bird hole in the front. I glued pods to the front and both sides of the house.
To make the door, I snipped the ends of my twigs and glued them over the pods.

The doorknob is made from the center of one of the colorful silk flowers.

Next I glued moss to the roof eaves, all the way around the house. Once the eaves were covered I continued the moss onto the roof and back of the house. Note that you can purchase sheets of moss made just for putting on roofs, but I like the chunky look of the patches of moss I bought.

I finished the bottom of the house with moss as well, covering any exposed wood.
Did you notice the little ladder on the side of the house in the finished photo above?

I used more of the twigs, simply cutting two at equal lengths and cutting shorter pieces for the rungs then hot glued everything together. For finishing touches, I glued some flowers and a little bird to the house.
See, aren’t they pretty?

The little birds are so sweet, found those at Hobby Lobby as well!

I also put together a little bird bath. Simply glue a terra cotta tray to the bottom of a tiny terra cotta pot. Instant bird bath!

When I first laid it all out, it looked really cute… but felt like it was still missing something. I stuck twigs in the ground to look like trees, leaned the ladder against the house, added the bird bath, found some wood slices I had left over from this project and made a path using some tiny pebbles I had in my studio. Still, it felt like something was missing.

I still had a full bag of moss left over so I filled in all the empty spaces and it felt complete!

I think I want to live here. That door! I really do love the way my little fairy garden turned out. Who knows, I may add things from time to time or it may stay just as it is. For now, I love it.
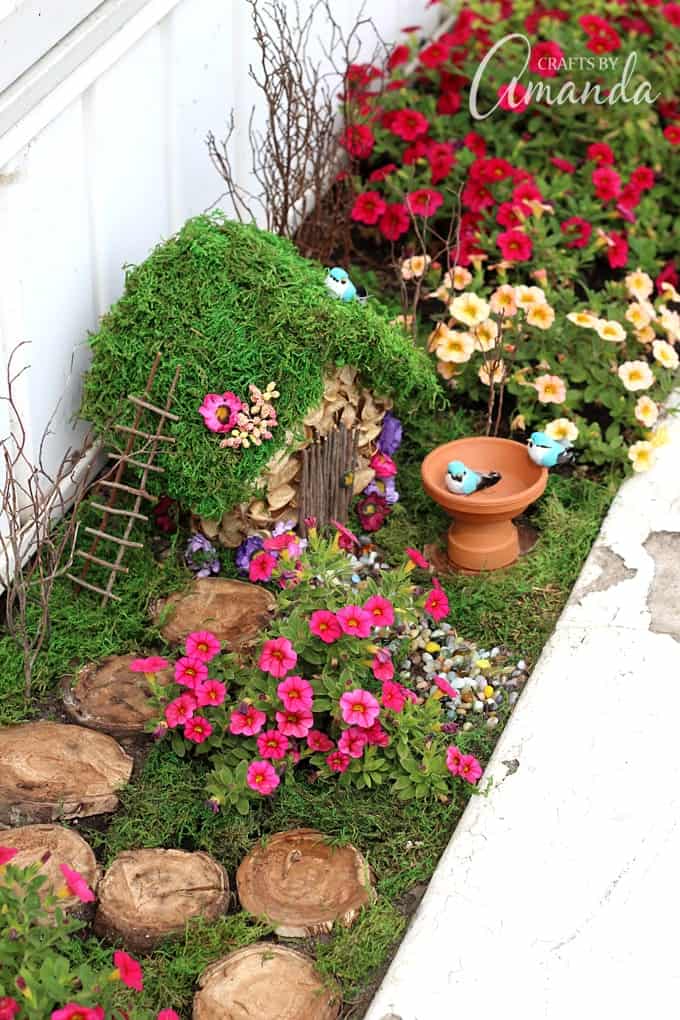
I hope you enjoyed this project and it inspires you to create a tiny world of your own!
More garden crafts you might like
- Fairy House Night Lights
- Fairy Garden Mason Jar Terrarium
- Fairy House
- Painted Rock Garden Markers
- Watering Can That Pours Crystals
How to Start a Fairy Garden
Learn how to start a fairy garden of your own! Our fairy garden is made from a simple inexpensive wooden birdhouse and natural materials.
Author: Amanda Formaro
Supplies
- Wooden birdhouse
- Dried pods
- Twigs
- Colorful silk flowers
- Moss
- Small artificial birds
- Small terra cotta tray
- Tiny terra cotta pot
- Hot glue gun
- Wire snips
Instructions
Hot glue the pods to the front and sides of the birdhouse.
To make the door snip the ends of several twigs and glue them next to each other over the pods.
Remove the center from one of the colorful silk flowers and glue it on as a doorknob.
Glue moss to the roof eaves, all the way around the house.
Glue moss onto the roof and back of the house.
Finished the bottom ledge of the house with moss as well, covering any exposed wood.
Make a ladder by cutting two twigs at equal lengths and cutting shorter pieces for the rungs then hot glue everything together.
Glue some flowers and a little bird to the house.
To make a bird bath, glue a terra cotta tray to the bottom of a tiny terra cotta pot. Glue one bird to the rim and one inside the bath.
Outside place your house where you want it then push twigs into the ground to look like trees, lean the ladder against the house, position the bird bath, and make a path using pebbles. Fill in any empty spaces with moss.
This post originally appeared here on Jul 24, 2015.
Amanda Davis is the crafty, entrepreneurial mother of four children. She loves to bake, cook, make kid's crafts and create decorative items for her home. She is a crafting expert and guru in the kitchen and has appeared online and in print publications many times over the years.
Latest posts by Amanda Davis (see all)


 English (US) ·