
.jpg)
 1 year ago
137
1 year ago
137
PROTECT YOUR DNA WITH QUANTUM TECHNOLOGY
Orgo-Life the new way to the future Advertising by AdpathwayAuthor by Jane and Sonja on February 25, 2025 Updated on February 25, 2025
A fun craft for kids, this DIY Stained Glass project is out of this world!
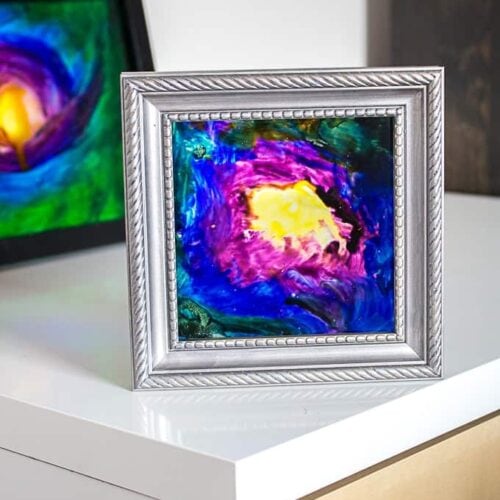
If you’re looking for a fun project that both you and the kids will enjoy, then this DIY stained glass idea is out of this world! This craft would be fun to do at home or even as a camp craft or classroom project!

DIY Faux Stained Glass
There’s really no right or wrong way to do this DIY stained glass craft, the result can be quite abstract or very realistic. I gathered up the materials I had around the house and in no time at all, my daughter and I were creating our own stained glass pictures together. I wanted my piece to resemble outer space so the glitter glue was key to mimicking twinkling stars in the galaxy. Watch the video below to see the process in action!
For more out of this world ways to keep your kids busy, check out this galaxy constellation card making idea and this paper plate flying saucer craft.

Materials Needed to make your own DIY Stained Glass
You can find the full printable instructions and materials list at the end of this post.
- Open Back Picture Frame, any size
- Elmer’s Glitter glue (any color)
- Elmer’s clear glue
- Food coloring (mix of blue, purple, yellow and green)
- Paint brushes, medium sized acrylic paint brushes

A few tips to get you started
- Protect the work surface with a sheet of newspaper or some plain paper.
- You can wear gloves to avoid staining your fingers with food coloring but I found the dye washes away fairly easily.
How to Make Kid-Friendly DIY Stained Glass
- Add clear glue to the center of the glass. Add a couple of drops of food color to glue (we added yellow dye). Mix the two together on the glass using your paintbrush.
- Add glitter glue to the surrounding area and add a few drops of food color throughout (we added purple). It works best if you paint one color at a time to avoid the colors mixing together and turning brown. Paint a few swirls to resemble outer space.
- Continue working outwards adding new colors and mixing the existing color on the glass. The more dye you add, the darker the result. It’s best to work fairly quickly so that the glue doesn’t harden before you have a chance to blend the joining colors.
- If you’re not happy with the painting, you can easily wash it away with some warm water even after it’s dried fully. When you’re satisfied with the masterpiece, leave it to dry fully before placing it in the frame.
- Insert into a frame and enjoy!

My daughter was amazed at how much it looked like an actual stained glass window. Although her piece didn’t turn out so space-like, the color combinations are still very beautiful and it looks amazing in her magenta painted bedroom.
Typically at Sustain My Craft Habit, my sister Jane and I stick to rock painting projects with the kids like these shark painted rocks, so this stained glass idea was a fun alternative. Happy crafting!
More Craft Ideas
- Mason Jar Aquarium
- Recycled T-Shirt Bracelets
- Faux Stained Glass Mosaic Luminary
- Fairy Garden Mason Jar Terrarium
Kid-Friendly DIY Stained Glass
A fun craft for kids, this DIY Stained Glass project is out of this world!
Author: Amanda Formaro
Supplies
- Open Back Picture Frame any size
- Elmer’s Glitter glue any color
- Elmer’s clear glue
- Food coloring mix of blue, purple, yellow and green
- Paint brushes medium sized acrylic paint brushes
Instructions
TIPS BEFORE STARTING:
Protect the work surface with a sheet of newspaper or some plain paper.
You can wear gloves to avoid staining your fingers with food coloring but I found the dye washes away fairly easily.
How to make Faux Stained Glass Art
Add clear glue to the center of the glass. Add a couple of drops of food color to glue (we added yellow dye). Mix the two together on the glass using your paintbrush.
Add glitter glue to the surrounding area and add a few drops of food color throughout (we added purple). It works best if you paint one color at a time to avoid the colors mixing together and turning brown. Paint a few swirls to resemble outer space.
Continue working outwards adding new colors and mixing the existing color on the glass. The more dye you add, the darker the result. It’s best to work fairly quickly so that the glue doesn’t harden before you had a chance to blend the joining colors.
If you’re not happy with the painting, you can easily wash it away with some warm water even after it’s dried fully. When you’re satisfied with the masterpiece, leave it to dry fully before placing in the frame.
Insert into a frame and enjoy!
This post originally appeared here on Jul 17, 2018.
Jane and Sonja are sisters, moms and lifelong craft addicts both living near Toronto, Canada with their families. They share their love of creativity, nature and coastal craft and DIY ideas on their blog Sustain My Craft Habit.
Latest posts by Jane and Sonja (see all)
Reader Interactions
Free Tutorials+ Free Craft Book!
Get your copy of of "5 Christmas Ornaments to Make" when you subscribe!


 English (US) ·