
.jpg)
 7 months ago
167
7 months ago
167
PROTECT YOUR DNA WITH QUANTUM TECHNOLOGY
Orgo-Life the new way to the future Advertising by AdpathwayAuthor by Amanda Davis on November 21, 2025 Updated on November 21, 2025
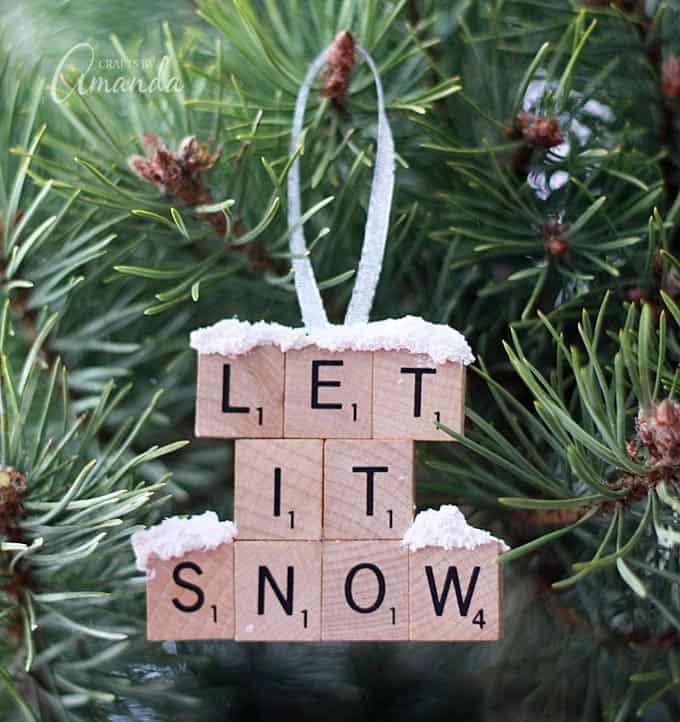
Make a "Let It Snow" scrabble tile ornament from scrabble tiles and snow texture paint! A fun Christmas ornament project for kids and adults.
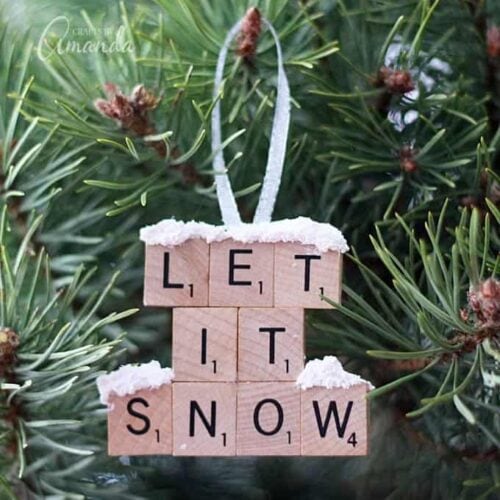
This adorable Let It Snow Scrabble tile ornament is made with either old board game pieces or purchased pieces! Use your favorite quote along with some snow paint to make your own.
Why we love this project
I love using scrabble tiles for craft projects, like these scrabble tile ornaments or a refrigerator scrabble game, they are just too cute and have a personality all their own! You can actually buy scrabble tiles from craft stores, or watch for them at garage sales and thrift stores. Here’s a Christmas ornament I made several years ago using Scrabble tiles.
This scrabble tile Let It Snow ornament makes a great group project to do with family or friends, or even a classroom! A few years ago I hosted a Christmas craft party where we all made our own scrabble tile ornament to hang on our trees at home. The beauty of this project is that you can use whatever short quote or saying you’d like or even use your initials or last name. Let the creativity run wild with this one!
I’ve had a lot of people ask me if I sell these, which I don’t. However, if you prefer to buy this ornament instead of making them, several Etsy shops have used my tutorial to create some and sell them.

How to make Scrabble Tile Ornaments
These step by step photos and instructions are here to help you visualize how to make this project. Please scroll down to simply print out the instructions!
UPDATE – If you watch the video, I’ve changed the instructions a little to make adding the felt backing a little easier. These photos do not reflect that change. Either way will work, though!
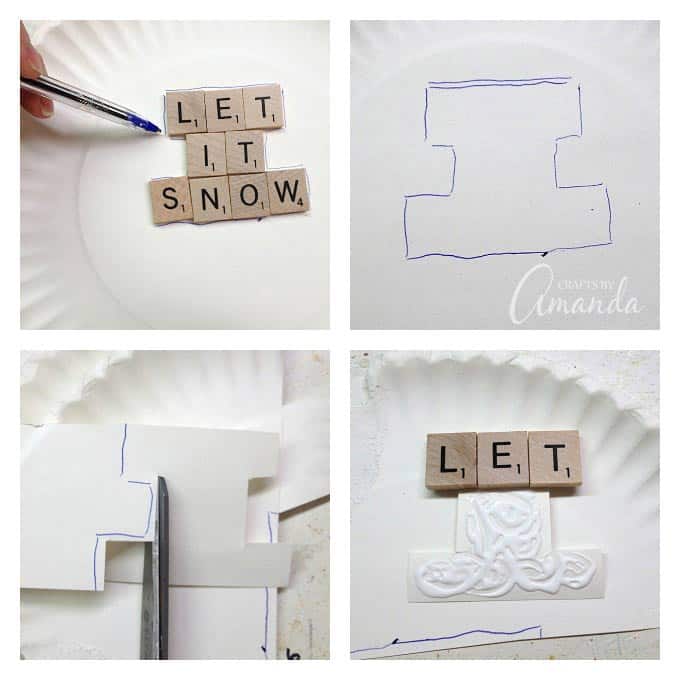
- On top of a paper plate, line the scrabble tiles up so that they spell “let it snow”. Use a pen to trace around the shape of the tiles onto the paper plate (this does not have to be perfect). As you can see, you just need a rough outline of the shape of your letters.
- Cut the shape out, cutting it smaller than the actual outline by cutting inside the lines by about ¼-inch. You want the shape to be large enough to glue the letters to, but small enough that they don’t overlap or show from the front of the ornament.
- Apply white craft glue all over the template then press the letters in place.
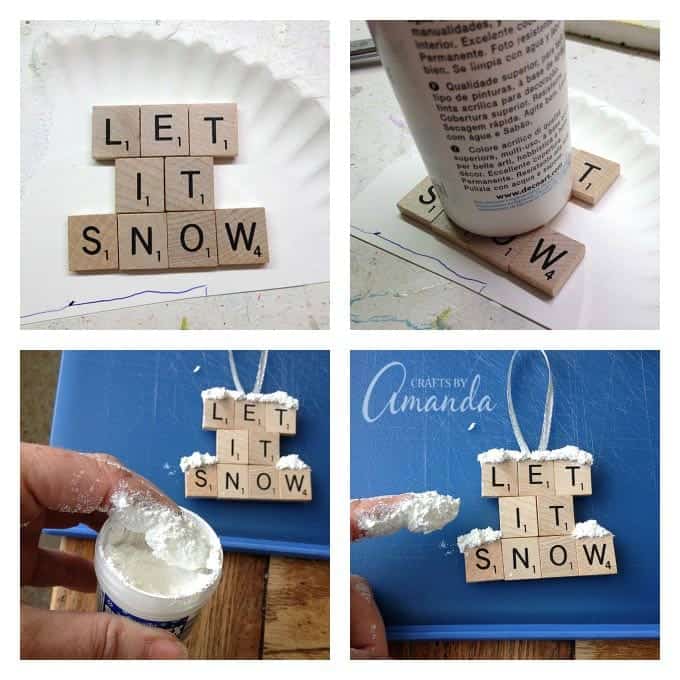
- Place something heavy on top of the letters, like a bottle of craft paint, and let them dry for 2-3 hours.

- Apply snow texture paint to the top edges of the letters to make it look like they have freshly fallen snow on them. You can use a palette knife, paintbrush, or even your finger. Be sure to wash your hands when you’re done! Let the snow texture dry for at least an hour (or as bottle directs).
- Once the snow texture paint has dried, cut a piece of ribbon and fold into a loop. Glue the ribbon hanger to the back of the ornament.
- Cut a piece of felt the same shape as the ornament and glue it to the back, covering the hanger. Let everything dry before hanging on your tree.
If you’re looking for more gifts that kids can make, check out this handy collection over at Red Ted Art. If you have extra scrabble tiles, turn them into a fun refrigerator scrabble game!
More Christmas Crafts
- Pom Pom Ornaments
- Christmas Votive Holders
- Twisted Paper Ornaments
- Mason Jar Lid Snowman
- Decoupage Wood Slice Ornaments
- Waterless Snow Globes
Let it Snow – Scrabble Tile Ornament
Make a "Let It Snow" scrabble tile ornament from scrabble tiles and snow texture paint! A fun Christmas ornament project for kids and adults.
Age Group: Crafts
Project Type: Christmas
Author: Amanda Formaro
Supplies
- Scrabble tiles that spell “let it snow”
- Snow texture paint
- Ribbon or twine
- Paper plate
- Felt
- White craft glue
Instructions
On top of a paper plate, line the scrabble tiles up so that they spell “let it snow”. Use a pen to trace around the shape of the tiles onto the paper plate (this does not have to be perfect).
As you can see, you just need a rough outline of the shape of your letters.
Place paper plate design over the top of your felt and cut the shape out, cutting it smaller than the actual outline by cutting inside the lines by about 1/4-inch. You will be cutting through both the paper plate and the felt. Hint, you can add a drop of glue between the plate and the felt to help keep it together temporarily while you cut.
Set the felt shape aside to use at the end of the tutorial.
Your paper plate shape should be large enough to glue the letters to, but small enough that they don’t overlap or show from the front of the ornament.
Apply glue all over the paper plate template then press the letters in place.
Place something heavy on top of the letters, like a bottle of craft paint, and let them dry for 2-3 hours.
Cut a piece of ribbon and fold into a loop. Glue the ribbon hanger to the back of the ornament.
Glue the felt to the back, covering the hanger.
Apply snow texture paint to the top edges of the letters to make it look like they have freshly fallen snow on them. You can use a palette knife, paintbrush or even your finger. Be sure to wash your hands when you’re done! Let the snow texture dry for at least an hour (or as bottle directs).
Let everything dry before hanging on your tree.
This post originally published Dec 16, 2013
Amanda Davis is the crafty, entrepreneurial mother of four children. She loves to bake, cook, make kid's crafts and create decorative items for her home. She is a crafting expert and guru in the kitchen and has appeared online and in print publications many times over the years.
Latest posts by Amanda Davis (see all)
Reader Interactions
Free CraftsBy email every week
Latest crafts straight to your inbox!


 English (US) ·